Showing posts with label birthday. Show all posts

Saturday, July 4, 2015

Next best thing to Helium


Janice MansonWagga's Home Remedies
Instead of using Helium gas to fill the balloons you could use a mix of vinegar with baking soda.
INGREDIENTS:
1 plastic bottle
Balloons
1 teaspoon of baking soda
3 tablespoon of vinegar
DIRECTIONS:
*Add the baking soda in a balloon using a small funnel.
*Add vinegar to the bottle. 
*Place the balloon on the bottle and then lift up the balloon letting the powder reach the vinegar. 
*You will see some bubbles forming and the release of dioxide carbon gas.
Vinegar is acid and when it finds the baking soda (sodium bicarbonate), the CO2 is formed.


Thursday, October 6, 2011

ZigZag Birthday Card

I know it is a little Springy for this time of year. I need a birthday card that would brighten my friends spirits. These word seem to be just what I wanted to say. Graphics are "More Love" by Joy Hall.
Hope she likes it.

Saturday, April 16, 2011

Tear bear Fishing Card


This is a tri-shuttle card. Still have some work to do on the tear bears, but I am not giving up. Graphic is "Bearing All Seasons" by Colleen Perry found at pccrafter.com, and altered to a tear bear. This was a birthday card and below is the present.
I left the Plano sticker on the case so he would know the brand. I added a matching larger tear bear with a "Go Fish" tag and list of flavors of jellybean inside. Now he can taste and guess the flavor.

Here is the original graphic.

Monday, February 21, 2011

Cupcake Card

Well it has been a while since I have had time to craft. I miss how much it relaxes me. I have quite a few birthdays this month. I did several version of the above card. This is the first version so it had a few flaws.
When I cut the Happy Birthday with my Craft Robo, I used inside lettering for the other card. Love getting two projects from one cut.
Sorry the inside is so blurry; I did not see the blur until I upload the picture. Of course the card was long gone by then. I used The Glitter Stack paper by DCWV and held the bottom flap closed with two glitter brads. The blank side of the tag hold my sentiment.
I had this idea for a reverse flap to write on for the inside of the other card. I still don't like how it turned out for cutting and folding. I'll have to work on that template some more. Sewing the flap closed was a boo boo, But with added sequined flowers, it turned a mistake into an okay project.
Couple of things about this project. Do not mix the sides of the template or you will have to trim. (see the picture above). Here are the PDF template and the GSD template. Please remember they are not for resale.

Saturday, October 24, 2009

Cow Birthday Card

One of my sisters loves cows. Here is the cutes little cow by Kim B's Designs. I almost did not make the mail, but thanks to this cute cow, the card was done in no time. Happy Birthday Deb.

Saturday, October 17, 2009

Faux Magazine Cover

This really is a picture of my sister-in-law, with the help of Fake Magazine Cover. I made this cute Birthday card for her. I cut the red inside with my Gazelle in just a matter of minutes, mounted it on white and then black. I think it turned out perfect with the front of the card.
It is great for the cowboy in your life, but they do have other covers.


Saturday, October 10, 2009

Corvette Birthday Card

Here is a birthday card I made for my niece to give to her boyfriend. He loves corvettes. The paper I mounted the picture on is "Once Upon A Time". I used velvet ribbon and rhinestones for embellishments. I cut the Happy Birthday with my Craft Robo. The hardest part was finding a picture she liked.


Saturday, September 19, 2009

Birthday Purse

Isn't this the cutest purse you have ever seen. It was a birthday gift from Little Bits of Everything . Thank you Sara! I love it.

Saturday, June 27, 2009

Quick Birthday Card

This card can be made in a matter of minutes. Use a Cuttle Bug folder to emboss the flower and lightly chalk the embossing. Find a picture with a cute face and cut just the face out. Add a cute graphic with dimensionals and attach a bow.

Sunday, May 3, 2009

Birthday Wishes

Not enough time to work up the card for this layout. Here is a happy birthday wish I cut with my new Gazelle. I am loving it so far. I will post the works and mat in GSD, WPC, and DXF in a couple of days. So if you are interested in the freebie, please check back.


Monday, March 9, 2009

100th Birthday

This was truly a labor of love. I worked up several ideas for the invitations. Some were too cutesy and some to gussied up. In the end, I went with something that shows the simple elegance of this wonderful classy lady,  my Grandmother.  It was a challenge restoring the photos. The elements corners is from Pam LaFor Designs.

Saturday, March 7, 2009

Repair Photo


I received a email with the following photo of my DGM who is having her 100th birthday this month. As you can see, the photo was is sad shape. Thanks to Adobe Photoshop, I was able to do a pretty fair job of repairing the photo. Even the torn section, looks pretty good.
I am working on invitations for her birthday party. Guess you know what I'll be working on all day.   I'll try and post them on Monday.

Sunday, February 22, 2009

Sister Birthday Card


Today is my sister's birthday. I designed this card just for her. I hope she has a wonderful day.  Here is the GSD file.

Monday, January 19, 2009

Spring Card and 6" Envelope


This birthday card was accompanied by a certificate to Jackpot, Nevada. Graphics are from pccrafter.com. Swiss dot embossing file used for the back ground with my Cuttlebug. Added Enjoy brad and cute little dice beads for embellishments. Here is the link to instructions for spring card by Sandy Hulsart.
Instructions for 6"Square Envelope
  1. Start with a 9"x 6" envelope (half card size)
  2. Fold one end down 3"
  3. Do not seal  flap shut. 
  4. On the folded end of the envelope, line up a CD to the top and center.
  5. With a pencil trace the bottom edge of CD to the fold line. 
  6. Still do not seal the flap.  
  7. Cut only the back layer of the envelope on the fold. Then cut the pencil drawn semi-circle.I have placed a colored paper between the front and back to show the cuts.
  8. Now seal the flap closed.
  9. Erase the pencil marks.
  10. If desired, cut a coordinating paper 5"x 5 3/4". Add adhesive only to the top edge of color paper. Slip paper inside and press the adhesive down at the top. Fold flap over.
  11. Insert finished card after you addressed the front. I plan on sealing shut with a sticker.

Saturday, January 17, 2009

Cake Slice Box

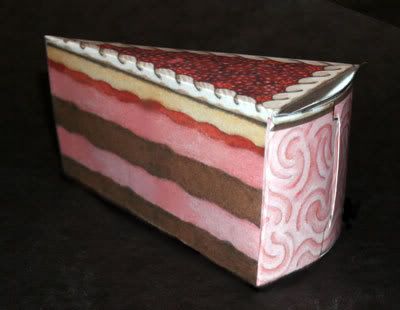
Waiting for a small gift or special note, this cake slice box is not yet sealed. I turned the tabs in before I laminated the outside, allowing for better contact for my adhesive. I will seal the flap closed with wide packing tape that will magically disappear into the lamination when applied. Graphics for the slice are from Delicious Sweets by Peggy Jo Ackley, and can be found at pccrafter.com. I am working a few changes to the template. I would like a rounded closure instead of flat. I will post template once I make my changes.

Saturday, January 3, 2009

Hottie Wand


Help!! I just hate posting something that I can not give credit.  This hottie wand is magic and can solve many problems brought on by hot flashes.  I am working the author of the poem. Hope to have the source by Monday. 

The wand is a tree shaped all-day sucker from Walmart. It could be used for an over-the-hill birthday as well. I printed the image and poem on gloss broucher paper. Green star garland is hot glued to the edges and metalic curly ribbon from the dollar store.  The graphic was emailed to me a long time ago. Laurie Furnell has some cute senior graphics on pccrafter.com that would work nicely. 

Saturday, October 18, 2008

Birthday Purse


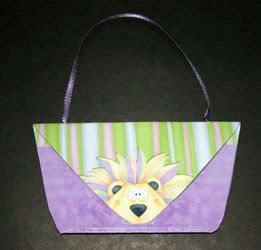
Little girls love purses. This birthday card is just the thing. Made with Party Animals by Leere' Aldrich found at pccrafter.com. 

Matching note pad is 3"x3".  Note pad is held in place inside the purse with a repositionable glue dot.

I used the clutch purse template and added a flap. Punch two holds where the flap and the back panel meet. Cut ribbon to desired length, poke end through hold and tie knot in the end.

Saturday, October 4, 2008

Purse Bag


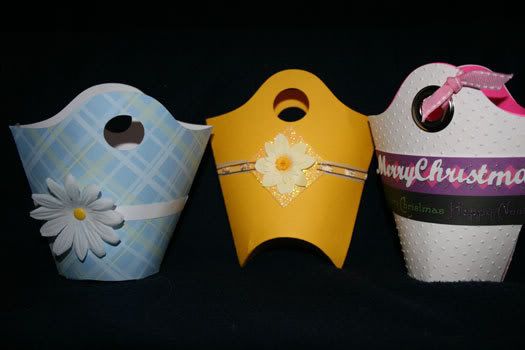
This cute bag is perfect for all occasions. Seen here for a birthday, fall thank you, and Christmas. The Christmas purse was cute twice, then trim the inside layer by an 1/8" on the bottom and side. The templates will be posted on Monday. I'm still trying to perfect a couple of things.

Saturday, August 23, 2008

Not much time to play this week. I have been busy registering students. Here is a quick birthday card I embossed with my Cuttlebug and added Mitzi graphic from pccrafter.com. I started with colored cardstock 8” x 5 ½”, white cardstock 11” x 5 ½”, Mitzi graphic and wording on photo paper. Emboss half the white cardstock, fold in half, and mount on the upper portion of the colored cardstock. I use a Scotch ATG machine for mounting. It is the best invention. Next trim around graphic and wording; mount wording on scrap white and colored cardstock and attach to card. Mitzi is mounted with pop dots (HINT: Because of the large area, I used only the scrap area around the pop dots.) I had a strip of colored cardstock I did not want to go to waste, so I used it to embellish the card and envelope. See ya Monday.

Monday, August 18, 2008

Peek-a-boo Boxs


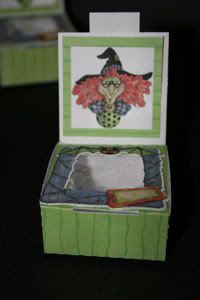
These peek-a-boo box measure 2”x2”x1”. They are just right for a small birthday gift or a special treat. Graphics from pccrafter.com were printed on to 67 lb. cardstock with registration marks. Thank you Brenda Quintana for sharing your drawn template with me. Here is the GSD template for this cute little box. I have emailed Brenda for her link, and will post it as soon as she sends it.

Request for template are too many; here's the link for word document from Brenda. Here is the link to she sent me for her blog.

LinkWithin

Related Posts with Thumbnails