 Because this is an Easter/Birthday gift, I will not see it on the wall. Thought someone out there might like to have the WPC file. I do have a GSD file but it has not been cleaned up or cut. If you would like it, just let me know in a comment.

Showing posts with label template. Show all posts
Showing posts with label template. Show all posts
Sunday, April 24, 2011
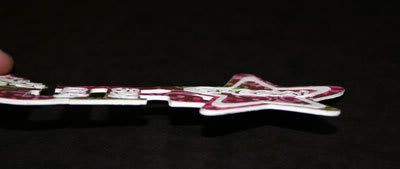
Fly Like A Butterfly
Because this is an Easter/Birthday gift, I will not see it on the wall. Thought someone out there might like to have the WPC file. I do have a GSD file but it has not been cleaned up or cut. If you would like it, just let me know in a comment.
Monday, February 21, 2011
Cupcake Card

Well it has been a while since I have had time to craft. I miss how much it relaxes me. I have quite a few birthdays this month. I did several version of the above card. This is the first version so it had a few flaws.

When I cut the Happy Birthday with my Craft Robo, I used inside lettering for the other card. Love getting two projects from one cut.

Sorry the inside is so blurry; I did not see the blur until I upload the picture. Of course the card was long gone by then. I used The Glitter Stack paper by DCWV and held the bottom flap closed with two glitter brads. The blank side of the tag hold my sentiment.

I had this idea for a reverse flap to write on for the inside of the other card. I still don't like how it turned out for cutting and folding. I'll have to work on that template some more. Sewing the flap closed was a boo boo, But with added sequined flowers, it turned a mistake into an okay project.

Couple of things about this project. Do not mix the sides of the template or you will have to trim. (see the picture above). Here are the PDF template and the GSD template. Please remember they are not for resale.
Thursday, June 18, 2009
 By request here is the tissue box I made a while back with graphics from Susan Seals called "Roses". They can be found at pccrafter.com Below is another version of the same template. I printed the top one on plain paper and laminiated one side before folding the box. The one purple box is printed on cardstock, no lamination. Here is the png template for the box. I did work this up for my Craft robo.
Sunday, June 14, 2009


Saturday, May 16, 2009
Graduation Box
 Here is a small graduation box made with my Craft Robo. The tassel is attached to the hat at the top with a small brad. It is 1 1/2" by 2 1/2". Just right for a graduation 2009 key chain. I am still trying to get the hang of changing RM 5.1 into DXF and other compatible files. But for those who can use a GSD file, Here is the file. Because I hate to waste paper, there are two boxes on one 8.5 x 11 sheet.
The box pictured was cut with a light weight card stock about 32 lb. Only because at the time I could not find heavier card stock in black. Be sure to slow down your machine because it has some very delicate cuts. I used a small white scrap square to back the inside of the graphic area. You could use clear transparency.
Sunday, February 22, 2009
Sister Birthday Card

Today is my sister's birthday. I designed this card just for her. I hope she has a wonderful day. Here is the GSD file.
Sunday, February 1, 2009
Sweetheart Ipod

I saw this on FamilyFun.com. I know it’s not a new idea, but I did make a GSD template for a box, instead of just wrapping the front. I also changed the Reese cups for pink caramel Kisses. Inside is a box of Sweetheart Kisses.


A pink 1/4" eyelet with re-enforced backing is perfect for the earphone connetion. A knot is too bulky, so I taped the end of white cording to the inside flap. The white cording was left over from the 4 in 1 hats I made for Christmas. Helpful Hint:Thread a bead onto the long cord. Put a dab of hot glue holds the short cord; slid the bead over the junction. It hold the cords together and covers you hand work nicely. I also used a dab of hot glue to attach the cord to the caramel Kisses.

Saturday, January 17, 2009
Cake Slice Box
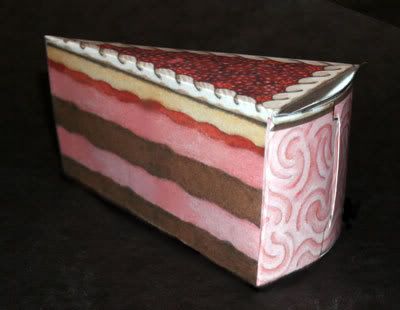
Waiting for a small gift or special note, this cake slice box is not yet sealed. I turned the tabs in before I laminated the outside, allowing for better contact for my adhesive. I will seal the flap closed with wide packing tape that will magically disappear into the lamination when applied. Graphics for the slice are from Delicious Sweets by Peggy Jo Ackley, and can be found at pccrafter.com. I am working a few changes to the template. I would like a rounded closure instead of flat. I will post template once I make my changes.
Saturday, December 13, 2008
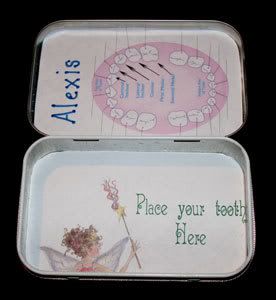
Christmas Tags

To jazz up a package, try making tags. They fit nicely in a mint tin. I typed the labels on to sticker paper, trimmed and applied to the tin. Here is the poem I wrote for the back.
All presents are not equal
I really must say
Some are very special
In a very simple way.
Give an extra little touch
To that present you choose,
With a special little tag
Specialmade for you to use.
Hugz ~ Dixie Parker/Kztmiz


There is a set of twelve handmade tags using graphics from pccrafter.com. Some of the tags have double sided tape and some have ties. Of course no gift is complete without chocolate. I found this cute chocolate band aid. All of this fits nicely inside the tin.

Here is one of my favorite tags. I have included a PDF template for your use. It fits on a regular 8" x 11" paper as long as you use the boardless print setting.
Monday, November 3, 2008
Tooth Fairy Tin
Monday, October 20, 2008
Bag in a Box

I love the bags made by Andrea but I could not wait to make my own version. Although the lighting was not the best for glitter foil paper, I couldn't wait to make this santa bag in a box. The belt is an 11" x 3/4" light weight paper threaded through a slotted silver brad. I hot glued on the buttons so I did not have to cut off the backs.


Saturday, October 18, 2008
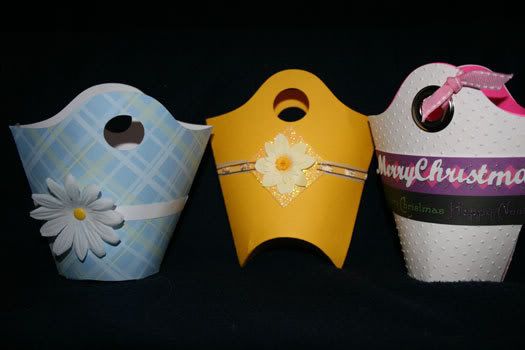
Birthday Purse
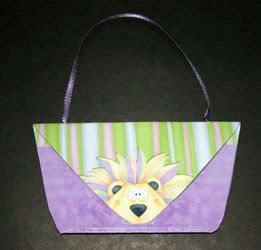
Little girls love purses. This birthday card is just the thing. Made with Party Animals by Leere' Aldrich found at pccrafter.com.
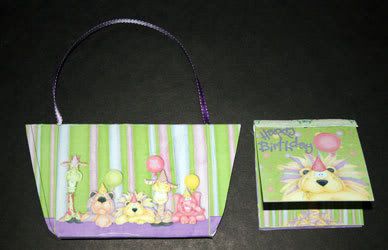
Matching note pad is 3"x3". Note pad is held in place inside the purse with a repositionable glue dot.

I used the clutch purse template and added a flap. Punch two holds where the flap and the back panel meet. Cut ribbon to desired length, poke end through hold and tie knot in the end.
Monday, October 6, 2008
Saturday, October 4, 2008
Purse Bag
Monday, September 29, 2008
Christmas Star

Just sharing this star with those of you who can use the GSD template file. I must warn you I have updated to RM 4.4, but I am working on getting back a copy of the older version. I would appreciate some feedback on the type of files everyone is using.
Saturday, September 13, 2008
Interlocking Card

Have you ever finished a fun project and forgot to take a picture? This card was designed for friendship week for Andrea. I did not take a picture, but after several months of international wandering was returned. It took a lot to get the interlocking and folds just right. So to save you the head ache, I am including a PDF file. The cute kite flying duck is from Laurie Furnell's Just Ducky Collection. Graphics for the card below are from Cowgirl Up by Tina Ledbetter. Both can be purchased at pccrafter.com.
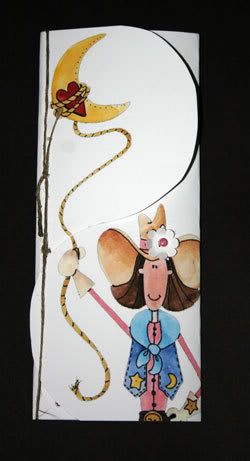
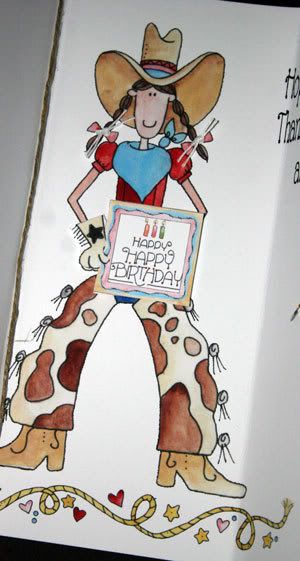

Here is the GSD file for those of you with a Craft Robo, Wishblade, or other. This card fits in a business size envelope.
Monday, August 18, 2008
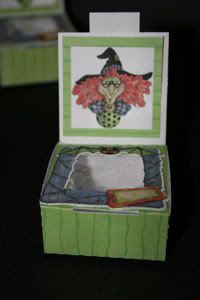
Peek-a-boo Boxs

Saturday, August 16, 2008
Bottled Mail From USA
Saturday, August 9, 2008
Faux Chipboard
I love the look of chipboard. Unfortunately I can not cut chipboard with my model of Craft Robo. Here is how I created my Faux Chipboard:
2. glue the 4 templates together (I use wet glue the first time. It curled slightly and took a long time to dry)
3. cut top layer with words out of light weight patterned paper
4. glue to the top of the cardstock

Monday, August 4, 2008
Cuttlebug Embellished Bag

Here is the template for the magic window cover png/jpg. I feel sorry for you, if you have to cut this by hand. I love my Craft Robo…it is worth every penny I spent. When I registered my CR, there was a cute bag template for download. This of course is altered a little and I used background graphic from pccrafter.com. I posted a picture of the bag for you to see, since you have seen enough of the magic card. Happy crafting..see you Saturday with a new project.
Subscribe to:
Posts (Atom)